 |  |  | The CS109UI module |
The CS109UI module
I have written a simple module called cs109ui that makes it possible to write programs with a simple graphical user interface without learning about the Swing library or worrying about event-based programming. We use this module for several projects in CS109.
Basic use
To use the module, you need to install it as explained in the installation page.
The module creates a window. You can fill this window with something interesting by drawing an image (using the operations explained here), and then calling show.
The setTitle command sets the caption of the window.
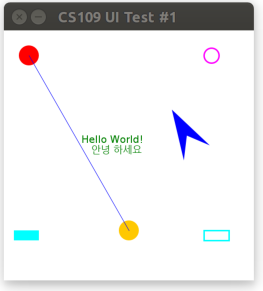
Here is a basic example (uitest1.kt). The function draw draws to a java.awt.image.BufferedImage (it's exactly the same drawing code as in the drawing example).
import org.otfried.cs109ui.*
import org.otfried.cs109ui.ImageCanvas
import org.otfried.cs109.Color
import org.otfried.cs109.DrawStyle

import java.awt.image.BufferedImage

fun draw(image: BufferedImage) {
  // get ImageCanvas for the image
  val g = ImageCanvas(image)

  // clear background
  g.clear(Color.WHITE)

  // draw two filled circles
  g.setColor(Color.RED)
  g.drawCircle(50.0, 50.0, 20.0)  // FILL is the default
  g.setColor(Color.ORANGE)
  g.drawCircle(250.0, 400.0, 20.0)

  // draw an unfilled circle with a pen of width 3
  g.setColor(Color.MAGENTA)
  g.setLineWidth(3.0)
  g.drawCircle(415.0, 50.0, 15.0, DrawStyle.STROKE)

  // draw a filled and an unfilled Rectangle
  g.setColor(Color.CYAN)
  g.drawRectangle(20.0, 400.0, 50.0, 20.0, DrawStyle.FILL)
  g.drawRectangle(400.0, 400.0, 50.0, 20.0, DrawStyle.STROKE)

  // draw a line
  g.setLineWidth(1.0)   // reset to default
  g.setColor(Color(0, 0, 255)) // same as Color.BLUE
  g.beginShape()
  g.moveTo(50.0, 50.0)
  g.lineTo(250.0, 400.0)
  g.drawShape(DrawStyle.STROKE)

  // draw a non-convex quadrilateral:
  g.save()              // save current coordinate system
  g.translate(360.0, 260.0) // move origin to here
  g.rotate(-30.0)           // rotate 30 degrees counter-clockwise
  g.beginShape()
  g.moveTo(0.0, 0.0)
  g.lineTo(30.0, -40.0)
  g.lineTo(60.0, 0.0)
  g.lineTo(30.0, -100.0)
  g.closePath()
  g.drawShape()
  g.restore()           // restore current coordinate system

  // draw some text
  g.setColor(Color(0, 128, 0)) // a darker green
  g.setFont(20.0, "Batang")
  g.drawText("Hello World!", 155.0, 225.0)
  g.drawText("안녕 하세요", 175.0, 245.0)

  // done with drawing
  g.done()
}

fun main(args: Array<String>) {
  setTitle("CS109 UI Test #1")
  val image = BufferedImage(500, 500, BufferedImage.TYPE_INT_RGB)
  draw(image)
  show(image)
}
We compile and run the program:
$ ktc uitest1.kt
$ kt Uitest1Kt
The program opens a new window like this:
Updating the display
You can change the contents of the window by drawing a new image and calling show again. (You can draw to the same image as before or use a new one.)
By waiting some time in between changes to the window, you can perform some simple animation, like letting objects blink or move inside the window.
Here is a simple example that shows a blinking square. First the square appears for one second in red, then for one second in blue. Five seconds later the program terminates automatically (uitest2.kt):
import org.otfried.cs109ui.*
import org.otfried.cs109ui.ImageCanvas
import org.otfried.cs109.Color
import org.otfried.cs109.DrawStyle

import java.awt.image.BufferedImage

fun draw(image: BufferedImage, color: Color) {
  val g = ImageCanvas(image)
  g.clear(Color.WHITE)
  g.setColor(color)
  g.drawRectangle(100.0, 100.0, 300.0, 300.0)
  g.done()
}

fun showWait(image: BufferedImage, color: Color, ms: Int) {
  draw(image, color)  // draw rectangle
  show(image)
  waitForMs(ms)       // wait ms milliseconds
}

fun main(args: Array<String>) {
  setTitle("CS109 UI Blinking Rectangle")

  val image = BufferedImage(500, 500, BufferedImage.TYPE_INT_RGB)

  showWait(image, Color.WHITE, 500)  // 0.5 sec white picture
  showWait(image, Color.RED, 1000)   // 1 sec red rectangle
  showWait(image, Color.WHITE, 500)  // 0.5 sec white picture
  showWait(image, Color.BLUE, 1000)  // 1 sec blue rectangle
  showWait(image, Color.WHITE, 5000) // 5 secs white picture

  close() // close window and terminate program
}
Again, you can run this using
$ ktc uitest2.kt
$ kt Uitest2Kt
You can now write interesting programs, such as the Simon project: You can use the terminal for text output and text input, and the window for graphical output.
Animation
By updating the window very quickly, we can program some simple smooth animations. Here is an example that lets a red ball move smoothly over the screen (uitest-animation.kt):
import org.otfried.cs109ui.*
import org.otfried.cs109ui.ImageCanvas
import org.otfried.cs109.Color
import org.otfried.cs109.DrawStyle

import java.awt.image.BufferedImage

fun draw(image: BufferedImage, x: Double, y: Double) {
  val g = ImageCanvas(image)
  g.clear(Color.WHITE)
  g.setColor(Color.RED)
  g.drawCircle(x, y, 40.0)
  g.done()
}

fun main(args: Array<String>) {
  setTitle("CS109 UI Animation test")

  val image = BufferedImage(500, 500, BufferedImage.TYPE_INT_RGB)

  var x = 30.0
  var y = 30.0
  while (x < 500.0) {
    draw(image, x, y)
    x += 2
    y += 1
    show(image)
    Thread.sleep(10)
  }
}
Keyboard input
If we want to get a bit more advanced, we can perform all interaction with the user through the window. We can use the drawString function to show text in our window. The next step is to allow the user to control the program by pressing keys in the window.
This is done using the waitKey function. It waits until the user has pressed a key, and then returns the character pressed. Here is a simple test program (uitest3.kt):
import org.otfried.cs109ui.*
import org.otfried.cs109ui.ImageCanvas
import org.otfried.cs109.Color
import org.otfried.cs109.DrawStyle

import java.awt.image.BufferedImage

fun draw(image: BufferedImage, color: Color) {
  val g = ImageCanvas(image)
  g.clear(Color.WHITE)
  g.setColor(color)
  g.drawRectangle(100.0, 100.0, 300.0, 300.0)
  g.done()
}

fun main(args: Array<String>) {
  setTitle("CS109 UI Keyboard Input Test")

  val image = BufferedImage(500, 500, BufferedImage.TYPE_INT_RGB)

  draw(image, Color.RED)
  show(image)

  println("Now press some keys inside the CS109 UI windows")
  println("Pressing 'q' will terminate the program")

  while (true) {
    val ch = waitKey()
    println("Got character $ch")
    if (ch == 'q')
      close()  // close window and terminate program
  }
}
After the window has appeared, try to type keys with the focus on the window. You should see the message Got character on your terminal. Pressing the 'q' key will terminate the program.
Mouse input
Another method for getting input from the user is to respond to mouse clicks inside the windows.
This is done using the waitMouse function. It waits for the next mouse click, and then returns the coordinates where the mouse was clicked.
Here is a simple test program (uitest4.kt):
import org.otfried.cs109ui.*
import org.otfried.cs109ui.ImageCanvas
import org.otfried.cs109.Color
import org.otfried.cs109.DrawStyle

import java.awt.image.BufferedImage

fun draw(image: BufferedImage, color: Color) {
  val g = ImageCanvas(image)
  g.clear(Color.WHITE)
  g.setColor(color)
  g.drawRectangle(100.0, 100.0, 300.0, 300.0)
  g.done()
}

fun main(args: Array<String>) {
  setTitle("CS109 UI Mouse Input Test")

  val image = BufferedImage(500, 500, BufferedImage.TYPE_INT_RGB)

  draw(image, Color.RED)
  show(image)

  println("Now click the moused inside the CS109 UI windows")
  println("Close the window to terminate the program")

  while (true) {
    val (x,y) = waitMouse()
    println("Mouse click at ($x, $y)")
  }
}
Dialogs
We can make our programs more professional by using additional pop-up windows, usually called "dialogs".
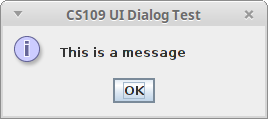
The simplest one just shows a message to the user. The user has to press "Ok" to continue the program. For instance, with this code
showMessage("This is a message")
we would get this pop-up window:
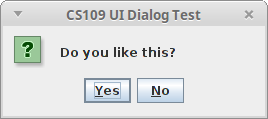
val yesno: Boolean = askYesNo("Do you like this?")
It looks like this:
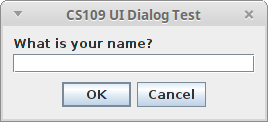
We can also ask the user to enter a string:
val name: String = inputString("What is your name?")
It looks like this:
| | | The CS109UI module |