 |  |  | LED matrix |
LED matrix
A common method for signboards or information displays in public places is using an LED matrix.In this project, we program an LED matrix animation for an LED matrix of size 32x16.
Start by downloading the two files ledmatrix.kt and square.kt.
Compile them both:
$ ktc ledmatrix.kt square.kt
You can now run the animation as follows:
$ kt LedmatrixKt 24 100
The first number (24) indicates the size of the (simulated) LEDs on your screen, the second one the speed of the simulation, in milliseconds between updates. In this case, 100ms, so that's an update rate of 10 Hz.
You can omit one or both arguments to use default settings.
You will see a simulated LED matrix display, showing an animated square that scrolls four times over the display area:
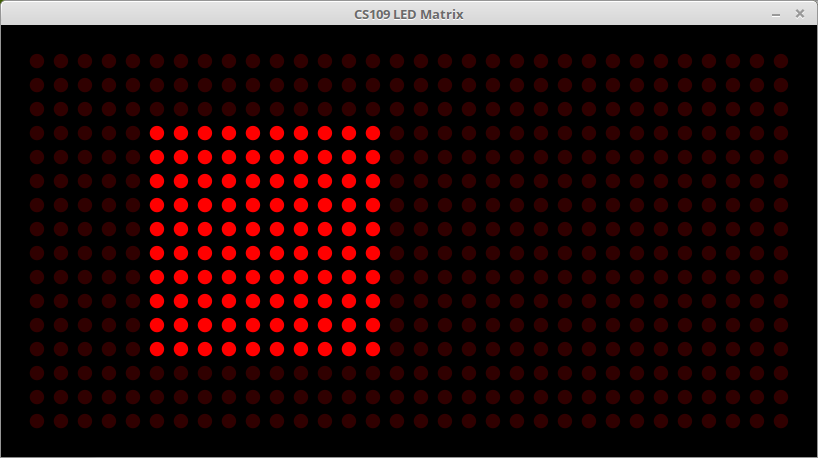
Like many public displays (for instance, in the Daejeon city buses), it shows a text that scrolls once through the display.
To try it, you should first delete your entire classes subdirectory. Then compile both files again and run the program:
$ ktc ledmatrix.kt text.kt
$ kt LedmatrixKt 12
As you noticed, the program consists of two files, ledmatrix.kt, and another file (square.kt or text.kt). The file ledmatrix.kt contains the simulation of the LED matrix on your computer screen. You must not modify this file! (And in fact you do not need to look at it at all for this project.)
The second file implements the actual LED animation. There are only two functions: setup() and loop(). The setup() function is called once at the beginning of the animation. It's purpose is to set the starting values of all the variables for the animation.
Afterwards, the loop() function will be called in regular intervals to compute the next step in the animation. This function must write the desired LED picture to the bitmap leds.
The argument leds is a bitmap of 32x16 pixels (that is, 32 pixels wide, 16 pixels high), and is of type BufferedImage.
You can set LEDs to be on or off by changing the color of the pixels in this bitmap: Black (pixel value 0) means LED is off, any other color means the LED is on.
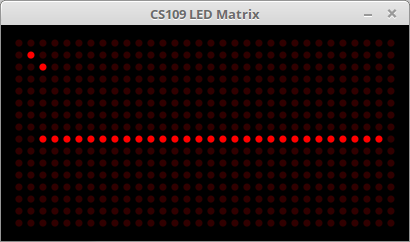
For example, this code:
fun loop(leds: BufferedImage): Int {
  // now set a few LEDs
  leds.setRGB(1, 1, 1)
  leds.setRGB(2, 2, 1)
  for (x in 2..30)
    leds.setRGB(x, 8, 1)
  return 100
}
will generate this display:
Alternatively, you can create an ImageCanvas to draw to the bitmap, as in the square.kt and text.kt examples:
fun loop(leds: BufferedImage): Int {
  val g = ImageCanvas(leds)
  g.setColor(Color.RED)
  g.drawRectangle(x.toDouble(), 3.0, 10.0, 10.0)
  g.done()
  // ...
}
You can start with square.kt, text.kt, or with the following empty template.kt:
//
// Template for LED matrix animation
//

import org.otfried.cs109ui.ImageCanvas
import org.otfried.cs109.Color
import java.awt.image.BufferedImage

// --------------------------------------------------------------------

// Put the student ids of all members of your team in the following list.
// It is enough if one of you submits the file.

val authors = listOf(20169999, 20168888)

// --------------------------------------------------------------------

// global variables to control the animation

// put your global variables here

// --------------------------------------------------------------------

// setup() is called once to set up your animation:

fun setup() {
  // setup your global variables
}

// --------------------------------------------------------------------

// loop() is called  to compute the next frame of the animation.
// The argument leds is a bitmap of size 32 x 16.
// loop() needs to draw the next frame of the animation on this bitmap.
// Black means LED off, anything else means LED on.
// The bitmap is already cleared to black before loop() is called.
// If loop() returns 0, then the animation ends.

fun loop(leds: BufferedImage): Int {
  val g = ImageCanvas(leds)
  g.setColor(Color.RED)
  // do some drawing
  g.done()

  // after drawing the current image, update global variables

  // return 0 when the animation is finished,
  // otherwise return time between frames in milliseconds
  return 100
}

// --------------------------------------------------------------------
Your animation must indicate when it is finished by returning 0 from the loop function—check the example projects for how this is done.
Please do not let it run forever, so that we can later combine all student projects into one class animation.
During testing, it is quite convenient to be able to run the animation faster and slower than intended (using the speed parameter of LedmatrixKt). However, your function loop should return the the speed at which it is intended to be watched. This will be used when you call LedmatrixKt without the speed parameter. (It is okay to return different numbers from each call to loop, so that you can change the speed of the animation.)
| | | LED matrix |