 |  |  | Drawing images |
Drawing images
To draw something, you first need a canvas to draw on. We will use java.awt.image.BufferedImage, a bitmapped image that you create by providing the desired width and height in pixels.
Then we use a small package I've written to draw to this image. (You could of course use standard java.awt functions for doing this. But the java.awt interface is somewhat old-fashioned, and using the cs109ui package has the advantage that you can later reuse the exact same drawing code in Javascript and on Android.)
When you are done drawing, you can save the image to a file using the javax.imageio.ImageIO.write function.
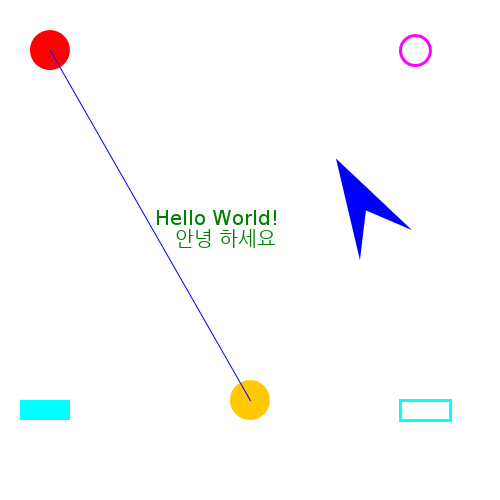
Here is a complete example that shows some drawing functions (drawing.kts):
import java.awt.image.BufferedImage
import org.otfried.cs109ui.ImageCanvas
import org.otfried.cs109.Color
import org.otfried.cs109.DrawStyle

// Size of image
val w = 500
val h = 500

// create an image
val image = BufferedImage(w, h, BufferedImage.TYPE_INT_RGB)

// get ImageCanvas for the image
val g = ImageCanvas(image)

// clear background
g.clear(Color.WHITE)

// draw two filled circles
g.setColor(Color.RED)
g.drawCircle(50.0, 50.0, 20.0)  // FILL is the default
g.setColor(Color.ORANGE)
g.drawCircle(250.0, 400.0, 20.0)

// draw an unfilled circle with a pen of width 3
g.setColor(Color.MAGENTA)
g.setLineWidth(3.0)
g.drawCircle(415.0, 50.0, 15.0, DrawStyle.STROKE)

// draw a filled and an unfilled Rectangle
g.setColor(Color.CYAN)
g.drawRectangle(20.0, 400.0, 50.0, 20.0, DrawStyle.FILL)
g.drawRectangle(400.0, 400.0, 50.0, 20.0, DrawStyle.STROKE)

// draw a line
g.setLineWidth(1.0)   // reset to default
g.setColor(Color(0, 0, 255)) // same as Color.BLUE
g.beginShape()
g.moveTo(50.0, 50.0)
g.lineTo(250.0, 400.0)
g.drawShape(DrawStyle.STROKE)

// draw a non-convex quadrilateral:
g.save()              // save current coordinate system
g.translate(360.0, 260.0) // move origin to here
g.rotate(-30.0)           // rotate 30 degrees counter-clockwise
g.beginShape()
g.moveTo(0.0, 0.0)
g.lineTo(30.0, -40.0)
g.lineTo(60.0, 0.0)
g.lineTo(30.0, -100.0)
g.closePath()
g.drawShape()
g.restore()           // restore current coordinate system

// draw some text
g.setColor(Color(0, 128, 0)) // a darker green
g.setFont(20.0, "Batang")
g.drawText("Hello World!", 155.0, 225.0)
g.drawText("안녕 하세요", 175.0, 245.0)

// done with drawing
g.done()

// write image to a file
javax.imageio.ImageIO.write(image, "png", java.io.File("drawing.png"))
The generated drawing looks like this:
Colors
Colors are specified using an org.otfried.cs109.Color object. There are some predefined colors:
- Color.BLACK
- Color.BLUE
- Color.CYAN
- Color.DARK_GRAY
- Color.GRAY
- Color.GREEN
- Color.LIGHT_GRAY
- Color.MAGENTA
- Color.ORANGE
- Color.PINK
- Color.RED
- Color.WHITE
- Color.YELLOW
val color = Color(0, 200, 0) // slightly darker greenYou can also construct a color from a 24-bit integer:
val color = Color(0x00c800) // slightly darker green
Drawing style
Every shape can be drawn in two ways: either as a filled shape, or by drawing with a "pen" along the outline of the shape (or both).
You select the drawing style with one of the constants
- DrawStyle.STROKE to draw the outline of the shape (in this case the line width is important);
- DrawStyle.FILL to fill the shape (this is the default and can always be omitted);
- DrawStyle.STROKE_AND_FILL to do both.
Text font and alignment
To draw text, you need to set a font on the ImageCanvas using setFont. You can just provide a point size like this:
canvas.setFont(16.0)or set a different typeface by using one of the standard names "Monospaced", "Serif", or "SansSerif", or the name of a real font installed on your system:
canvas.setFont(16.0, "Serif")
When calling drawText, you have the choice to align the text at its left edge, the right edge, or its horizontal center. The alignment is selected with the constants
- TextAlign.LEFT (this is the default and can be omitted);
- TextAlign.CENTER;
- TextAlign.RIGHT.
ImageCanvas
The org.otfried.cs109ui.ImageCanvas object does all the drawing. You can use its width and height properties to inquire the size of the canvas (but of course you can also check the original BufferedImage).
The basic methods of ImageCanvas are:
- clear(c: Color) clears the entire canvas to the given color;
- setColor(color: Color) sets the color for future drawing operations (see above for the Color type);
- setLineWidth(width: Double) sets the pen width for outline drawing;
- drawRectangle(x: Double, y: Double, width: Double, height: Double, s: DrawStyle) draws a rectangle;
- drawCircle(x: Double, y: Double, radius: Double, s: DrawStyle) draws a circle with center at \((x,y)\) and radius \(r\);
- setFont(size: Double, face: String) sets the font for text drawing operations (see examples above);
- drawText(text: String, x: Double, y: Double, a: TextAlign) draws the string aligned at position \((x, y)\);
- done() it is recommended to call this method when you are done with drawing.
More complicated shapes
To draw shapes other than rectangles and circles, you need to use the shape methods of ImageCanvas:
You describe the shape by walking along the outline. First, call beginShape(), then moveTo(x, y) to go to the starting point of the outline. Now make a sequence of lineTo(x, y) calls to describe the boundary of the shape. You can complete the outline by calling closePath(), this returns to the starting point (which you set when you called moveTo(x, y)). For filled shapes you normally want to call closePath, for outlined (stroked) shapes it depends if you want the shape to be a closed curve or not.
Finally, call drawShape to draw the shape.
Transformations
You can modify the coordinate system to make it easier to specify your objects:
- translate(x: Double, y: Double) makes the point \((x, y)\) the origin of the new coordinate system;
- rotate(degrees: Double) rotates the coordinate system clockwise;
- scale(sx: Double, sy: Double) scales the coordinate system in the \(x\)- and \(y\)-direction (so calling scale(2.0, 2.0) doubles the size of your drawing).
Often you only want to modify the coordinate system temporarily, and return to the original coordinate system when you are done with some part of the drawing (see the quadrilateral in the code above). This is achieved by calling save() before changing the coordinate system, and restore() when you want to return to the previous settings.
Transparency
Normally, shapes that are drawn later cover shapes that have been drawn before (the so-called "painter's model" of computer graphics).
However, you can call setAlpha(alpha) to set a transparency for future drawing operations. When alpha == 255, drawing is opaque and completely covers what was drawn before. When alpha == 128, you are drawing with 50% transparency: The result is a blend of half the original color and half the newly drawn color.
Measuring text
The method textWidth(text: String) returns the width of the text if you were to draw it now with the current transformation and font settings.
| | | Drawing images |